
Most of our trip reports are a retelling one way or another about what we did on a trip. This one is a little different as it is about things that are useful to know when managing a trip to St Abbs. Some of it applies to all trips though the detail is specific to St Abbs. It struck me on our trip last year that there is a lot of knowledge about diving certain locations within the club, but it is not always easy to get hold of the most useful knowledge in one place when you need it and so the wheel gets reinvented and potentially learnings lost.
In this report we are going to look at useful things to know, in particular for St Abbs, which could let a dive manager spend more time thinking about the other hundred things that need sorting out to make their trip run smoothly.
Launching and recovery including trailer storage
Not all slipways are the same. Knowing that you have access to a usable slipway and when you can use it is essential to every RIB trip. More than one trip has failed or been curtailed because of issues with launching or recovering our boats.
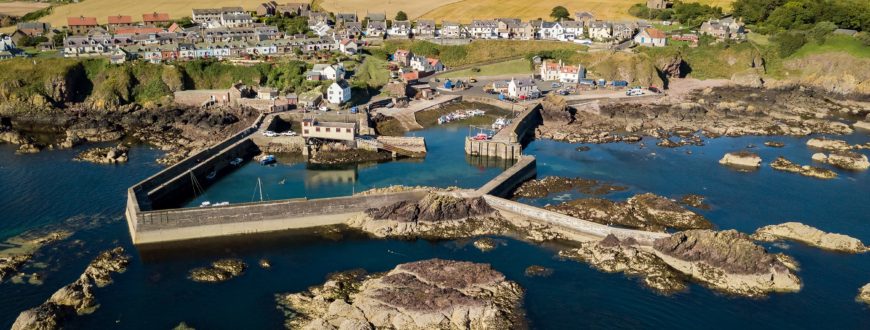
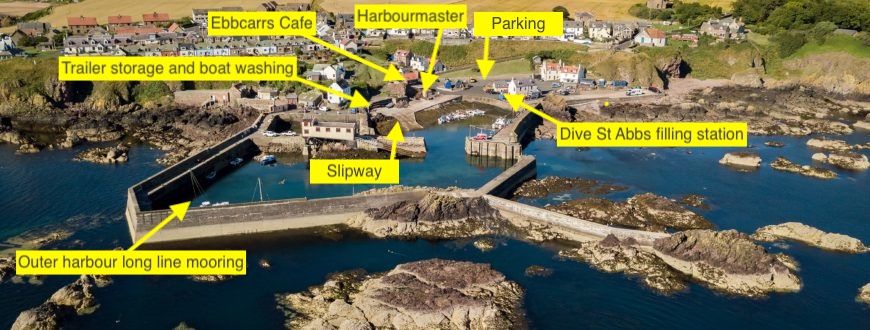
St Abbs is built on a rocky outcrop at the foot of cliffs. The good news is once you have navigated the tourists going up the steep narrow access road with no passing points there is a lot of room to manoeuvre the trailer onto the slipway. What you need to know is that the slipway has a dogleg and is mostly usable mid-tide for a trailer and boat like ours. You can’t use it for quite a few hours around Low Water (LW), and often you can’t use it around High Water (HW).
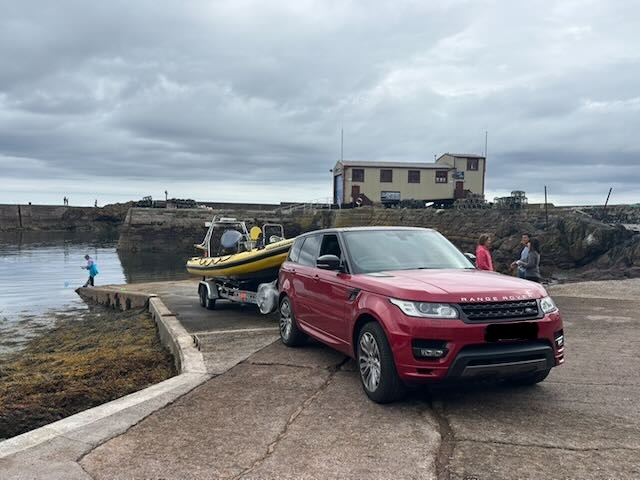
Waiting for launch 3.5H before HW with a tidal height of about 2.5m. The person fishing on the left is standing at the end of the slipway where it drops down a couple of feet. We launched about an hour later with 3.5m of tide to easily float the boat with the trailer at the bottom of the slipway. If you can launch or recover with the trailer at the bottom of the slipway it gives you relatively deep water to launch into or approach from for recovery because of the drop-off at the bottom of the slipway. [Photograph: Nick Barter]
The dogleg is wide enough that it isn’t a problem for an experienced tower. But given the shallow slope of the slipway from the dogleg and the awkwardness of launching a large RIB if you aren’t pointing it out into the deeper water you can only safely launch with the trailer pointing down the bottom half of the slipway. Once the water gets too high you can’t do that with the trailer attached to your vehicle.
So, when can you launch or recover? The launch and recovery window usually opens from 3H before HW Eyemouth and closes up to 3H after HW. But between these times depending where you are on the Neaps to Springs tidal cycle the window could close for a significant time around HW. What you need is between 3.5m and 4m of tidal height. Roughly. I am sure people can suggest imaginative ways to extend the top of that range but you will save yourself a lot of trouble by just knowing when to be ready for the easiest and safest launch or recovery.
To know when it will be easy to launch or recover you need some tidal information. The tidal information I have used in this article is all from the Imray Tides Planner app. You may have other sources.
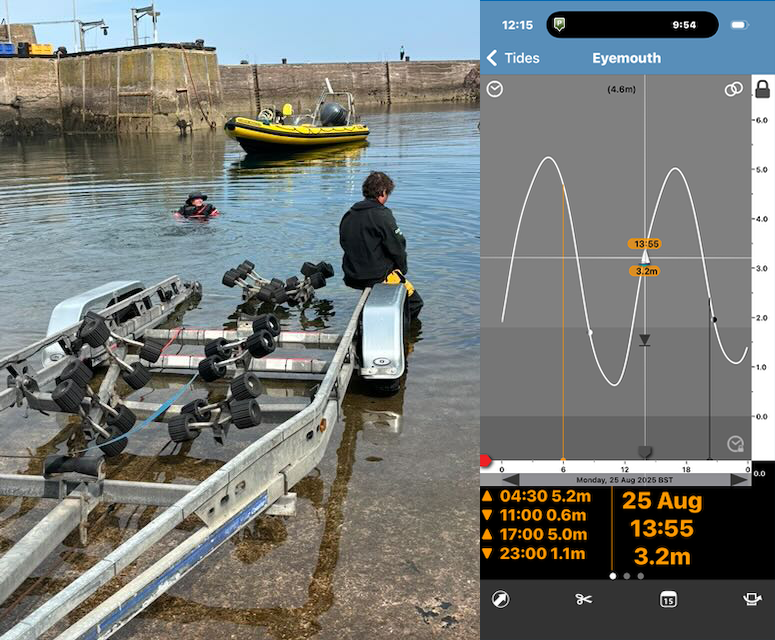
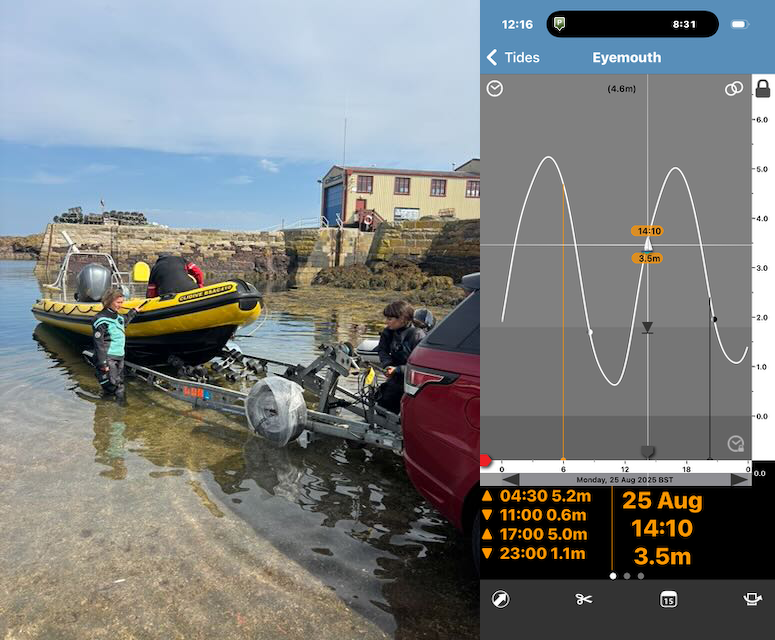
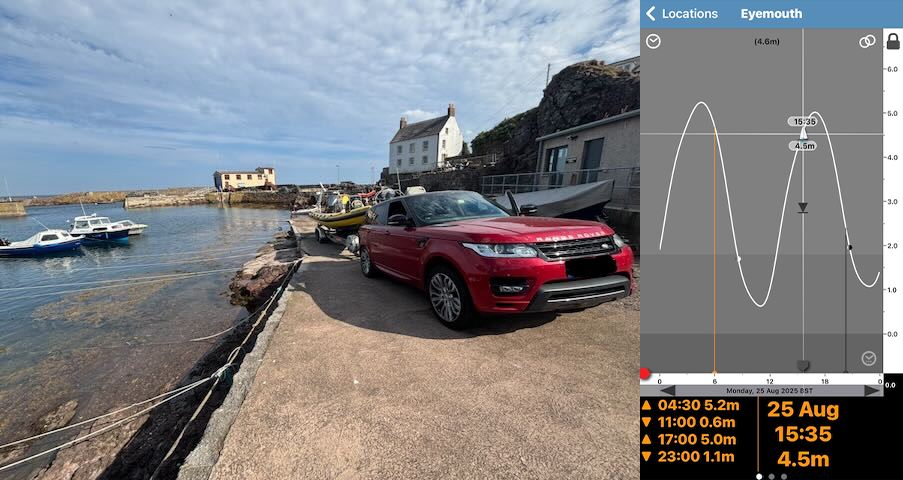
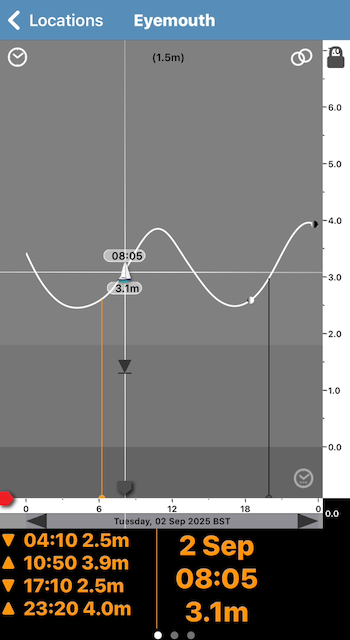
On a Neap the slip is probably usable for about 5 hours throughout the whole HW window, but on a King tide Spring it might only be usable for one hour at the start and one hour at the end of the HW window (3H before to 2H before and 2H after to 3H after). You will need to check your tidal times and heights for your trip. Don’t expect the predictions to be perfect, the predictions will be about right but are never exact. Also, different apps may have slightly different HW times and slightly different depth predictions. But they are all close enough. You need the water depth you need whenever that arrives. Know your tide times and tidal heights, be there and be prepared. [Tidal Information: Imray Tides Planner]
Trailer storage is easy; you leave it at the top of the dogleg of the slipway. The Harbourmaster will show you where. It is between the Harbourmaster’s office and the steps up to the white house to the left looking up the slipway. These steps are also where you will find the taps to wash the trailer and boat. At really high spring tides the trailer may be awash but mostly it will stay dry.
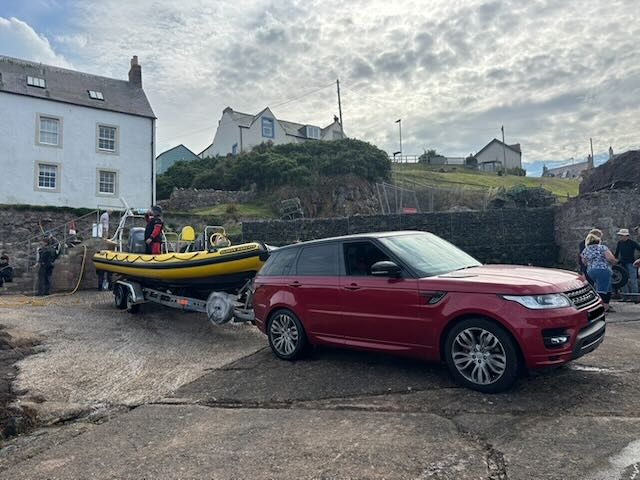
Washing down Yellow using the taps at the top of the steps. This is the bend of the dogleg of the slipway. Where the people are standing on the right is where the trailer is stored. [Photograph: Nick Barter]
Paying for launch, recovery, mooring and storage is done when you are there, usually when you are leaving (but you should of course book the mooring in advance). The Harbourmaster can sometimes be difficult to find but persevere. He’s very helpful.
Overnight mooring
During the first trips I did to St Abbs many years ago the boat was kept on the long lines drying moorings in the inner harbour next to the slipway. But more recently it has been kept in the outer harbour which does not dry out. This is much more useful but it uses a mooring style most people will not be used to.
The boat is moored alongside others away from the harbour walls using long lines across the far corner of the outer harbour. You obviously can’t secure the boat against the walls because of the rise and fall of the tide, and there are no floating pontoons which rise and fall with the tide. The long lines allow the boat to move up and down with the tide while staying roughly in position out on the water away from the walls.
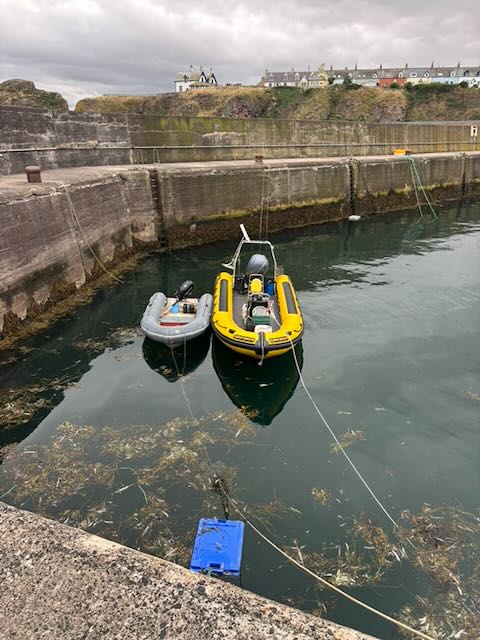
Long line mooring with bow and stern lines. This image is at a tidal height of 4m. The range that day was 1 to 5m. Note the lines are lying in the water to allow for the expected 3m drop in the tidal height. [Photograph: Nick Barter]
You use one long line from the bow (fixed to the metal fixings on the console), and one from the stern (using the A-frame). It is best achieved by at least one helper on the harbour wall who can lower lines to the boat from the wall, and two in the boat (one to drive and one to handle lines). The boat can motor carefully between the two walls (avoiding prop entanglement with all the lines in the water) to retrieve both lines. The boat crew should exit up the harbour wall ladders after the second line is lowered and both lines are securely fastened to the boat, and of course all the usual final boat checks have been completed.
With everybody ashore the boat can be moved into position with roughly equal lengths of line either side by pulling in or letting out the two lines from the walls. When the boat is central the lines can be secured to the bollards or chains on the harbour wall. The lines should not be tight. They are likely to lie in the water especially at HW because enough loose scope is needed for the fall of the tide. Even at LW the lines should have a distinct curve down into the water and not be anywhere near taught. The boat should be able to move around a little bit. The weight of the lines will bring it back to a central position.
Boat operation in and around the harbour
To load and unload the boat of equipment and divers you bring the boat to the inner harbour near the slipway.
At LW and the first half of the tide the slipway is mostly dry and the inner harbour very shallow. You should enter the inner harbour with a shallow shelving shore approach. People will need to be in the water guiding the boat quite early. If the tide is right off the slipway then people need to be careful with the step up and down from the slipway, it is slippery at the bottom. If the tide is really low on a Spring people can be in the water walking the boat from the entrance to the inner harbour or even before. You will see the shallowness on your approach to the main harbour entrance.
From mid-tide when the slipway begins to cover particular attention should be taken not to hit the keel into the edge of the slipway. You will need to use the slipway to load and unload at this point, and it will be necessary for people to be on the slipway in the water holding the boat. There is a little ledge at the bottom of the slipway that helps.
The boat can be left anchored with shot weights (ideally fore and aft) in the shallows below the slipway so long as it is not in the way of the inner harbour entrance which is used by the local dive boats, fishing boats, and tourist boats. Care should be taken to make sure our RIB won’t swing onto the rocks, the harbour wall, or if the tide is still falling become grounded. You will often do this for lunch and air fills. You must not do this overnight.
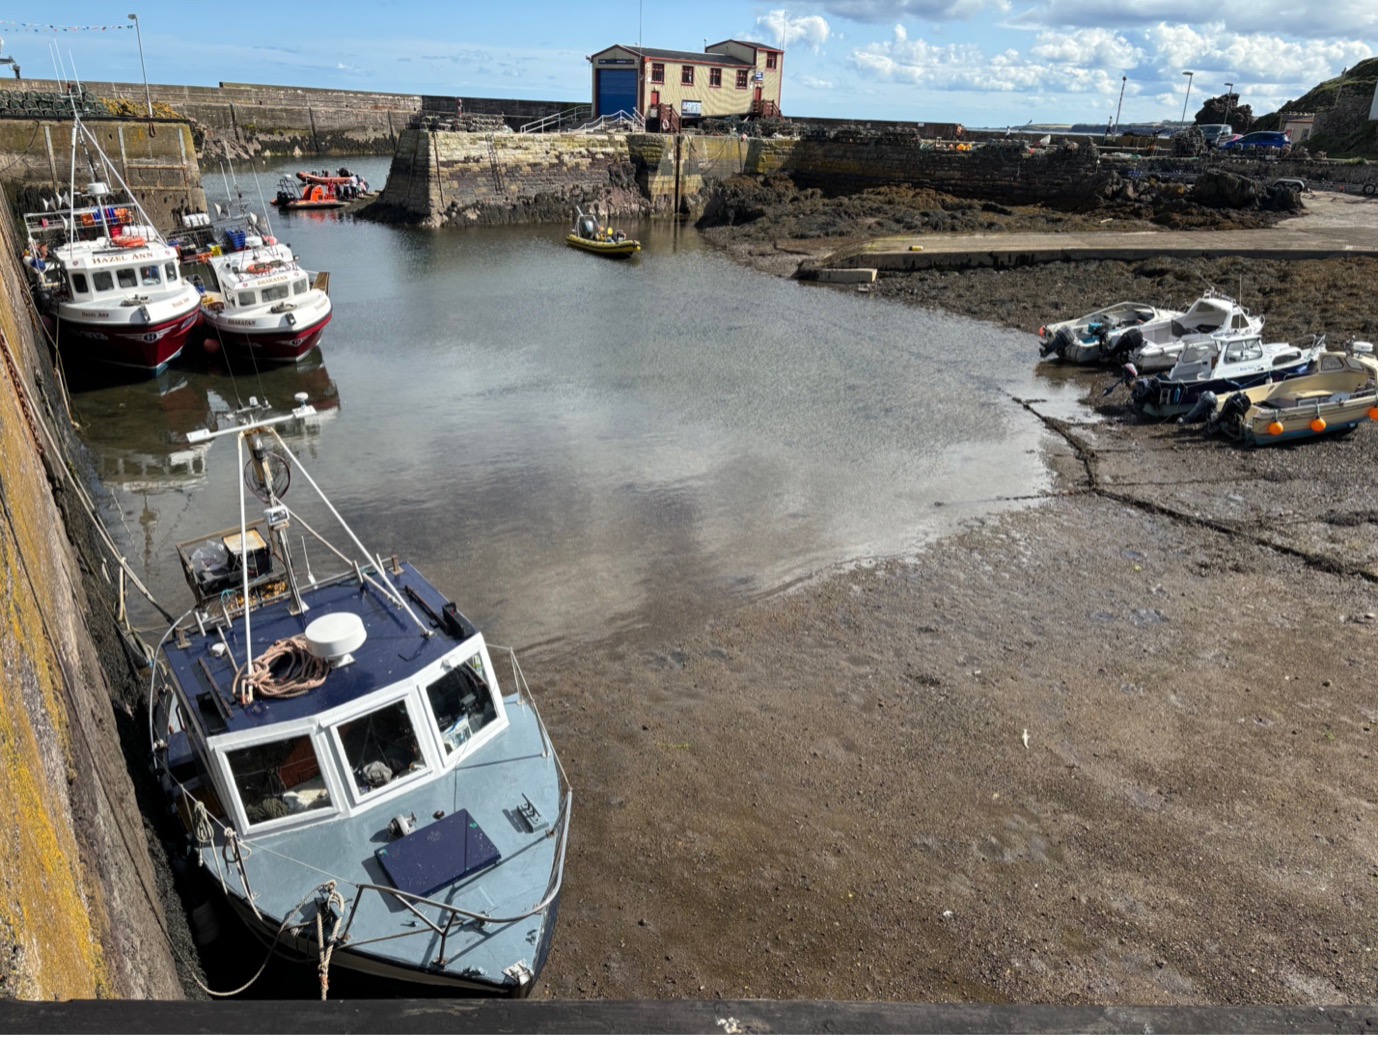
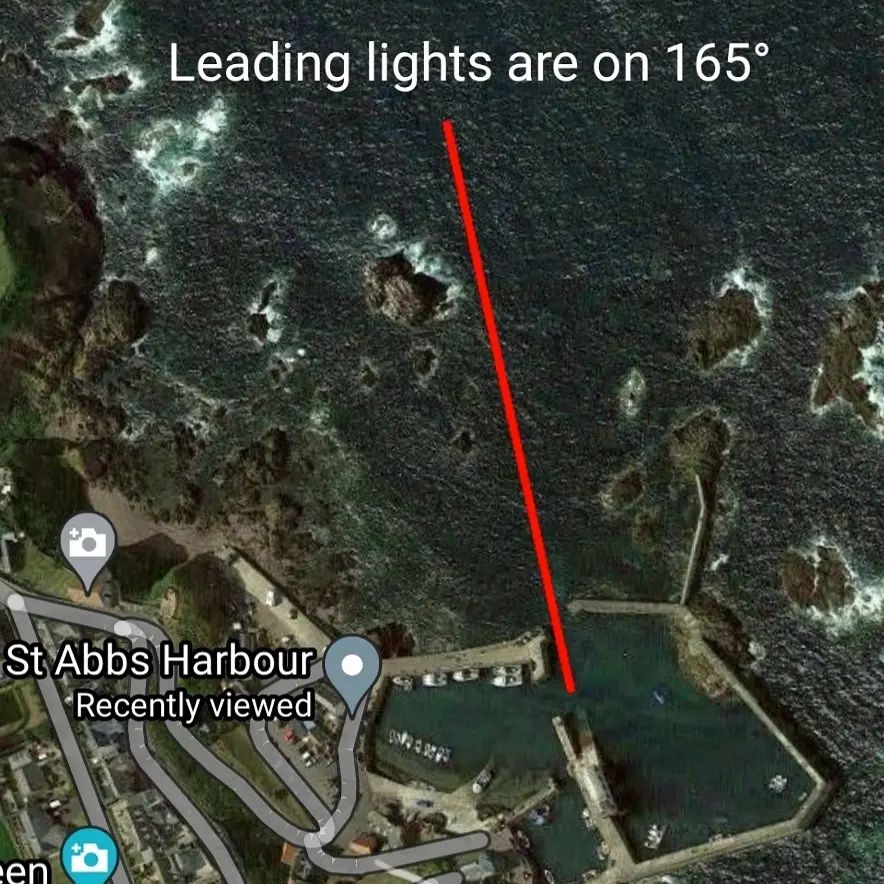
When entering or exiting the outer harbour use the leading lights that will guide you between the rocks lining both sides of the route to the open sea. The low rocks are very visible at LW but covered at HW. The safe water bearing to enter the harbour is 165º. Look for the lifeboat station on the middle harbour wall to locate the leading lights and markers. It isn’t overly difficult to traverse this run but it does sometimes make inexperienced cox’n nervous when they first try it.
Daily Logistics
You are very unlikely to be staying at St Abbs harbour. Most trips use the Coldingham caravan parks which are a couple of miles away. So you need transport morning and afternoon for all divers and their equipment. There is enough parking at the harbour because you will beat all the tourist traffic there in the morning. It becomes very busy later on, and you must pay for a full day’s parking because it is monitored.
Cars are also useful for the evenings because there is very little in Coldingham once you have eaten at the New Inn once. Eating in Eyemouth is more usual.
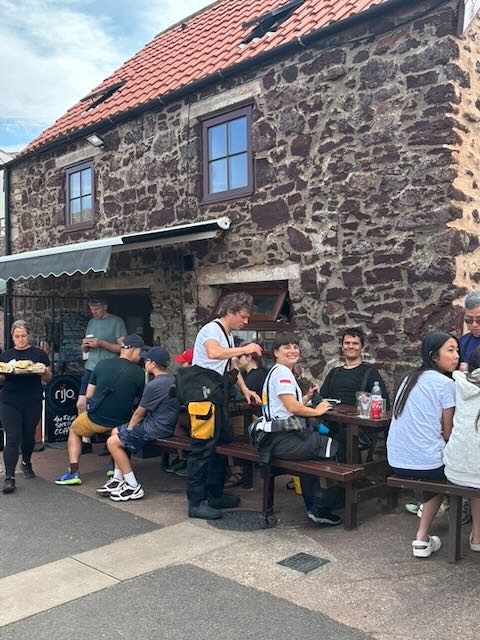
There is much better news on the food front at lunchtime (and even the morning if ropes-off allows it) because the Ebbcarrs café at the harbour is one of the best lunchtime or brunchtime or afternoon ice cream spots you could hope for on a dive trip. It is excellent. I’d book on a St Abbs trip just so I can eat at Ebbcarrs. But it is busy on a bank holiday weekend so get someone to get orders in for those doing cylinders or the boat.
Clidivers enjoying Ebbcarrs Cafe [Photograph: Nick Barter]
Air is very convenient and easy. Dive St Abbs is just across the road at the top of the slipway. Your gas manager should keep an excellent relationship with them because they can be very helpful. Since all the diving is so close you are very unlikely to go out with two cylinders and stay out for the day. However, it is worth bringing two cylinders because what you drop off at lunchtime is ready when you return in the afternoon, and what you drop off in the afternoon is likely to be ready for the morning if it isn’t done before you finish post dive snacks and drinks at Ebbcarrs. Or if you are late back and need to drop the afternoon cylinders off in the morning then they are ready by lunchtime.
Dive planning and slacks
The flood tide travels South down the North Sea and creates HW at roughly the same time for a long stretch of this coast. St Abbs has the same HW as Eyemouth and even the Leith HW in the Firth of Forth about 35 miles away is only 5 or 10 minutes earlier. The ebb tide flows North.
Along the whole stretch of coast the slack times are 3H after HW and LW. There are some sources that give a slack time 2H after LW but most of the tidal stream atlases line up with the 3H rule of thumb. Where the tidal atlases appear to show a slack might not line up exactly with that rule of thumb remember the tidal diamonds are offshore, but where you are diving is inshore and 3H after LW and HW is the accepted advice.
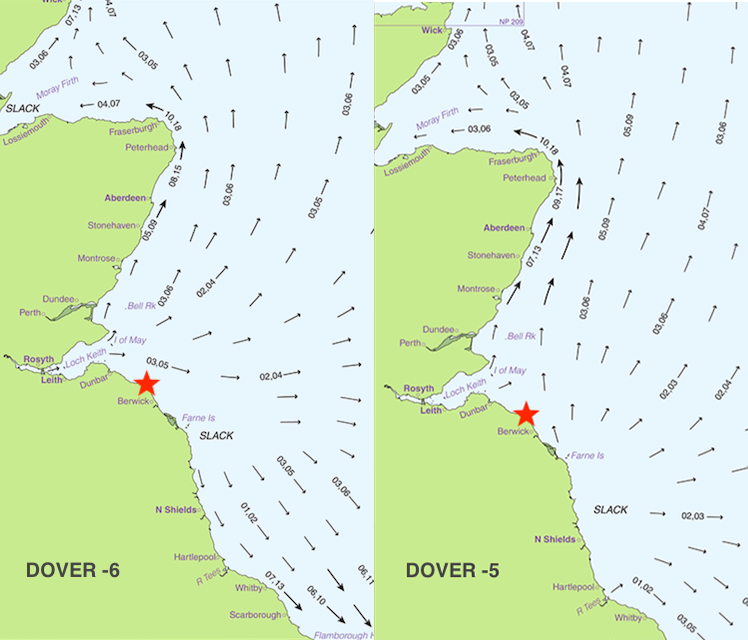
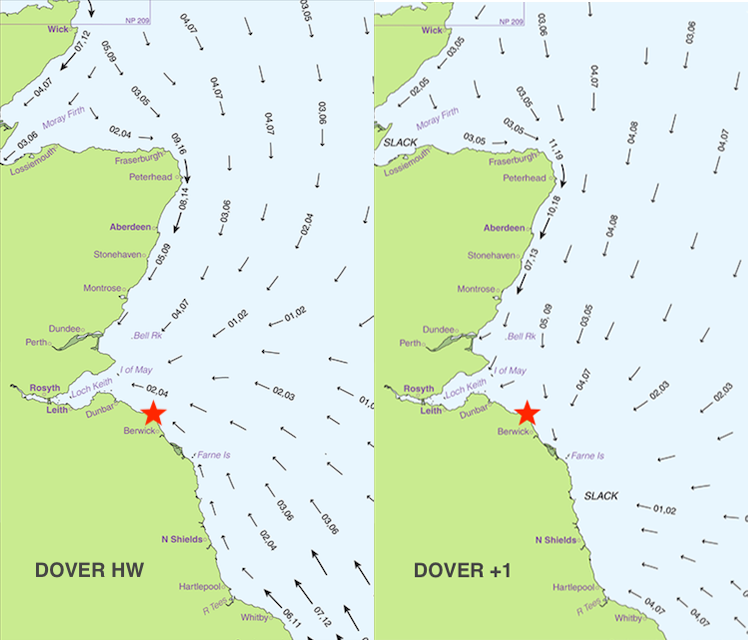
On Springs the slack is short at around 15 minutes which can easily catch you out. It is longer at around an hour on Neaps. In most places (but not all) on Neaps the current is low enough that you can dive any time.
Obviously, a site like the Glanmire wreck requires slack water and would be best dived on Neaps. It is also worth remembering that around the St Abbs headland the tide is compressed and the current runs much faster. Particularly on the flood if you were to put divers in on the Eastern side with the current building it would be easy for them to be swept around the headland leaving you in a situation where some divers are still on the East side while others are disappearing SW relatively quickly. It has happened!
But of course you don’t need slack for everything. The whole stretch of reefs between St Abbs Head and Fast Castle Head can be dived as drifts covering multiple sites or dived near slack as individual reefs. This gives lots of options for planning and experiencing the area with a variety of dive types even on the same reefs. This is also true for the reefs from St Abbs Head to Ebbcarrs, they are great at slack or as a gentle drift but around Springs don’t dive them in the couple of hours before HW or LW unless you want a fast drift!
St Abbs Overview
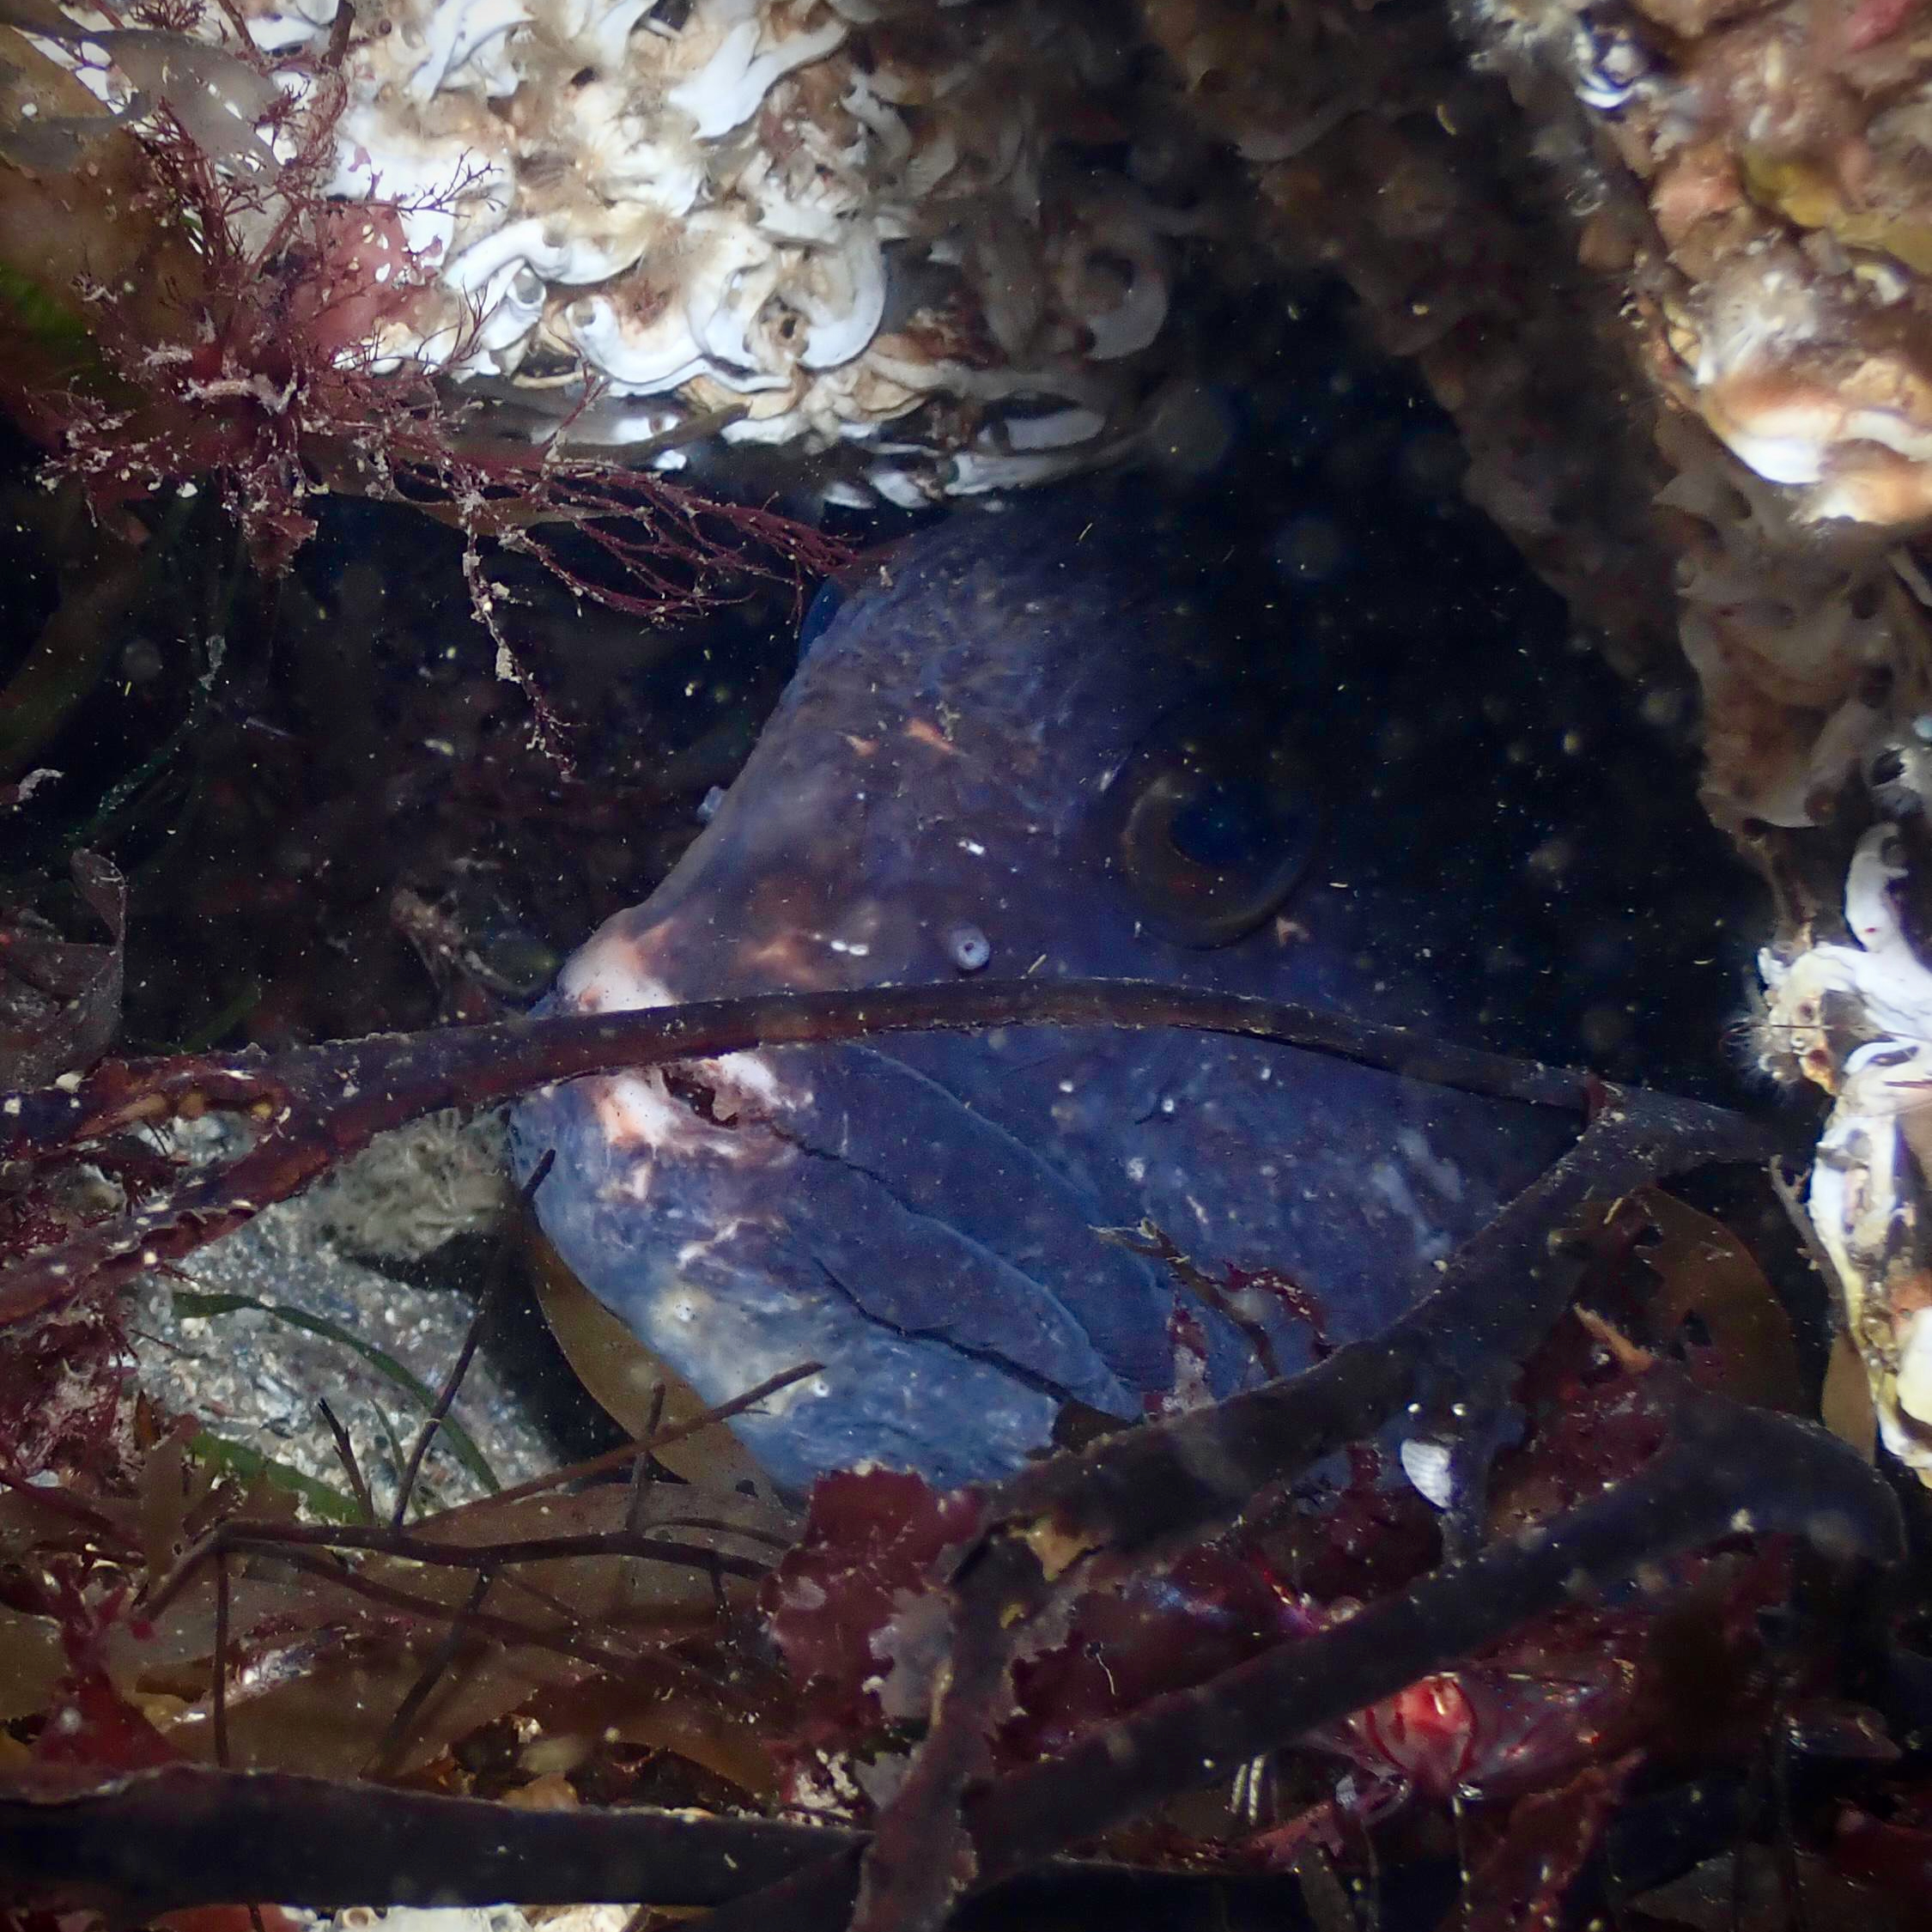
I hope that helps the next DM who organises a trip to St Abbs. It’s a great place to dive and the perfect stop over for our boats on the way back from our frequent Scottish expedition weeks. Good luck to whoever runs the next trip. You will probably find me on the boat anyway as I am still waiting for one of those days when I get to see five wolffish on the same dive or in the case of our DM on the 2025 trip eight in one weekend. Multiple wolffish have been found on Black Carrs every trip I’ve been on to St Abbs, unfortunately not by me. I’ve only ever seen one over a decade ago and so I will be back!
 We are an LGBTQIA+ friendly club
